How To Make Floor Plans For Free In SketchUp 2023
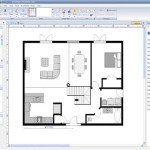
SketchUp is a popular 3D modeling software that can be used to create a wide variety of models, including floor plans. In this tutorial, we will show you how to make a floor plan in SketchUp for free.
Step 1: Download and install SketchUpThe first step is to download and install SketchUp. You can download SketchUp for free from the SketchUp website.
Step 2: Create a new modelOnce you have SketchUp installed, open the program and click on the "New" button. This will create a new model.
Step 3: Set the unitsBefore you start drawing your floor plan, you need to set the units. Click on the "Window" menu and then click on "Model Info". In the Model Info dialog box, click on the "Units" tab and select the units that you want to use. For example, you can select inches, feet, or meters.
Step 4: Draw the wallsTo draw the walls, click on the "Line" tool in the toolbar. Then, click on the start point of the wall and drag the cursor to the end point. Repeat this process to draw all of the walls in your floor plan.
Step 5: Add doors and windowsTo add doors and windows, click on the "Components" menu and then click on "Insert". In the Components dialog box, click on the "Doors" or "Windows" tab and select the door or window that you want to insert. Then, click on the location where you want to insert the door or window.
Step 6: Add furniture and other objectsTo add furniture and other objects to your floor plan, click on the "Components" menu and then click on "Insert". In the Components dialog box, click on the "Furniture" or "Objects" tab and select the object that you want to insert. Then, click on the location where you want to insert the object.
Step 7: Save your floor planOnce you have finished drawing your floor plan, click on the "File" menu and then click on "Save". In the Save dialog box, enter a name for your floor plan and click on the "Save" button.
Tips for making floor plans in SketchUpHere are a few tips for making floor plans in SketchUp:
- Use the "Layers" panel to organize your floor plan. You can create different layers for the walls, doors, windows, furniture, and other objects.
- Use the "Styles" panel to apply different styles to your floor plan. You can create different styles for the walls, doors, windows, furniture, and other objects.
- Use the "Sections" tool to create cross-sections of your floor plan. This can be useful for visualizing the different levels of your floor plan.
- Use the "Dimensions" tool to add dimensions to your floor plan. This can be useful for builders and contractors.

How To Make Floor Plans In Sketchup Pro

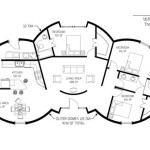
I Created This Architectural Floor Plan With Sketchup 2024

How To Make Floor Plans In Sketchup Pro

Creating 3d Floor Plans In Sketchup Part 1 The Essentials 22

How To Make Floor Plans In Sketchup Pro

How To Make Floor Plans In Sketchup Pro

Draw Plan Archives Free House And Apartment

Floorplanner Tools For Designers Uses Features Installation And Others

2d 3d Floor Plan Design Drawing Rendering Services Usa

Sketchup For Interior Design