How to Make a Simple Floor Plan in AutoCAD
AutoCAD is a powerful computer-aided design (CAD) software commonly used by architects, engineers, and other professionals to create detailed technical drawings. While AutoCAD is a robust program with a wide range of features, it is also user-friendly, making it suitable for beginners who want to create simple floor plans.
This guide will provide step-by-step instructions on how to create a simple floor plan in AutoCAD. Follow these steps to create your floor plan quickly and easily.
1. Start a New Drawing
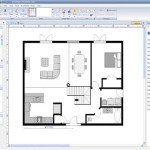
Open AutoCAD and start a new drawing by clicking on the "File" menu and selecting "New." A new drawing window will open.
2. Set the Units
Before you start drawing, it is essential to set the units to match the scale of your floor plan. Click on the "Format" menu, select "Units," and choose the appropriate units for your project. For example, if you are creating a floor plan of a residential home, you may want to use feet and inches.
3. Draw the Walls
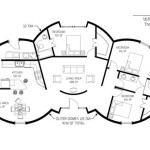
To draw the walls of your floor plan, use the "Line" command (shortcut: "L"). Click on the starting point of the wall, move the cursor to the endpoint, and click again. Continue drawing the walls until the outline of your floor plan is complete.
4. Add Doors and Windows
To add doors and windows to your floor plan, use the "Insert" menu and select "Block." Browse for the door or window block that you want to insert and click "OK." Place the block in the desired location on your floor plan.
5. Add Dimensions
Dimensions are crucial for understanding the size and scale of your floor plan. Use the "Dimension" command (shortcut: "D") to add dimensions to your drawing. Select the objects you want to dimension, specify the type of dimension, and click "OK."
6. Add Text and Annotations
You can add text and annotations to your floor plan to provide additional information or labels. Use the "Text" command (shortcut: "T") to add text, and use the "Insert" menu to add symbols or other annotations.
7. Save Your Floor Plan
Once you have completed your floor plan, save it by clicking on the "File" menu and selecting "Save." Choose a file name and location for your drawing.
Conclusion
Creating a simple floor plan in AutoCAD is a straightforward process that involves setting the units, drawing the walls, adding doors and windows, adding dimensions, adding text and annotations, and saving the file. By following these steps, you can quickly and easily create a floor plan that will help you visualize and plan your space.

How To Draw Floor Plans In Autocad Edrawmax

Autocad Simple Floor Plan For Beginners 1 Of 5

Making A Simple Floor Plan In Autocad Part 2 Of 3

How To Draw Floor Plans In Autocad Edrawmax

Simple Floor Plan Design Autocad File Free Cadbull

Autocad 2024 Making A Simple Floor Plan In Part 1 Of 3 2d Drawing

Is Autocad The Best Floor Plan For Estate Agents Elements Property

How To Draw Floor Plans In Autocad Edrawmax

Autocad Tutorial Draw A House Floor Plan Free Cad Blocks In Dwg File Format

40 X45 House Plan Free Autocad 2d Drawing N Design