How to Draw a House Plan in AutoCAD
AutoCAD is a computer-aided design (CAD) software program that is used to create 2D and 3D drawings. It is used by architects, engineers, and other professionals to create plans for buildings, products, and other objects.
If you are new to AutoCAD, the process of drawing a house plan can seem daunting. However, with a little practice, you can learn how to use the software to create professional-looking plans.
Here are the essential steps on how to draw a house plan in AutoCAD:
1. Start with a new drawing
When you open AutoCAD, you will be prompted to start a new drawing. Select the "Create a New Drawing" option and click "OK".
2. Set up the drawing units
The first thing you need to do is to set up the drawing units. This will determine the size of your drawing and the accuracy of your measurements.
To set up the drawing units, click on the "Drawing Units" button in the "Status Bar" at the bottom of the AutoCAD window.
In the "Drawing Units" dialog box, select the desired units from the "Units" drop-down list. You can also select the precision of your measurements from the "Precision" drop-down list.
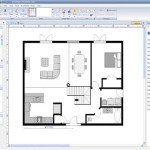
3. Draw the exterior walls
The next step is to draw the exterior walls of your house. To do this, use the "Line" tool in the "Draw" panel.
Click on the "Line" tool and then click on the starting point of the wall. Move the cursor to the ending point of the wall and click again to draw the line.
Repeat this process to draw all of the exterior walls of your house.
4. Draw the interior walls
Once you have drawn the exterior walls, you can start to draw the interior walls.
To draw interior walls, use the "Polyline" tool in the "Draw" panel.
Click on the "Polyline" tool and then click on the starting point of the wall. Move the cursor to the ending point of the wall and click again to draw the line.
Continue to click on the points where you want the wall to change direction.
When you have finished drawing the wall, double-click to close the polyline.
Repeat this process to draw all of the interior walls of your house.
5. Add doors and windows
The next step is to add doors and windows to your house plan.
To add a door, use the "Door" tool in the "Insert" panel.
Click on the "Door" tool and then click on the location where you want to insert the door.
In the "Insert Door" dialog box, select the desired door type and click "OK".
To add a window, use the "Window" tool in the "Insert" panel.
Click on the "Window" tool and then click on the location where you want to insert the window.
In the "Insert Window" dialog box, select the desired window type and click "OK".
6. Add dimensions
The final step is to add dimensions to your house plan.
To add a dimension, use the "Dimension" tool in the "Annotate" panel.
Click on the "Dimension" tool and then click on the two points that you want to dimension.

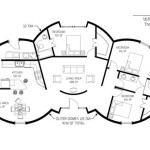
How To Draw Floor Plans In Autocad Edrawmax

How To Draw Floor Plans In Autocad Edrawmax

Making A Simple Floor Plan In Autocad Part 2 Of 3

Autocad Drawing And Coohom Design 3d Fast Rendering Blog

First Floor Plan Of Residence Detail Presented In This Autocad Drawing File 2d Auto Cad Ca Layout

Is Autocad The Best Floor Plan For Estate Agents Elements Property

Floor Plan Create 2d 3d Plans Autodesk

North Facing House Plan Drawing Autocad File Cadbull

Autocad Simple Floor Plan For Beginners 1 Of 5

Autocad Tutorial Draw A House Floor Plan Free Cad Blocks In Dwg File Format