How to Draw a Floor Plan on AutoCAD 2024 Free
Creating a floor plan in AutoCAD 2024 is a straightforward process that can be completed with a few simple steps. Follow this comprehensive guide to effortlessly draw a detailed and accurate floor plan for your architectural project.
1. Open AutoCAD and Start a New Drawing
Launch AutoCAD 2024 and click on the "Start" tab. Select "New" to create a new drawing file. Choose the preferred template or create a new one from scratch.
2. Set the Unit System and Drawing Units
Before starting to draw, set the appropriate unit system and drawing units. Click the "Units" button in the ribbon's "Drawing Units" panel. Choose the desired units (e.g., inches, feet, millimeters) and precision.
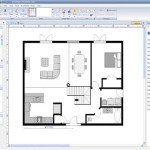
3. Draw the Walls
To create the walls, select the "Rectangle" tool from the "Draw" panel. Click on the drawing area to specify the starting point of the wall and drag the cursor to draw the wall to the desired length. Repeat this process for all the walls in the floor plan.
4. Add Doors and Windows
To insert doors and windows, select the "Door" or "Window" tool from the "Architecture" panel. Click on the wall where you want to insert the element and specify the size and type. You can also use predefined blocks for doors and windows.
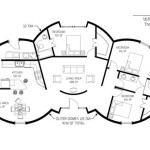
5. Divide the Space into Rooms
To divide the floor plan into rooms, use the "Room" tool from the "Architecture" panel. Click on the perimeter of the room to create a closed boundary. Assign a room name or number to each room.
6. Add Furniture and Fixtures
To furnish the floor plan, insert furniture and fixtures using the "Blocks" panel. Select the desired block from the AutoCAD library or import your own custom blocks. Place them in the appropriate locations within the rooms.
7. Add Dimensions and Labels
To dimension the floor plan, use the "Linear Dimension" tool from the "Dimensions" panel. Click on the elements to be dimensioned and specify the dimension values. Similarly, add labels to rooms, doors, and other features using the "Text" tool.
8. Save and Export the Floor Plan
Once the floor plan is complete, save it as a DWG file by clicking "File" > "Save As." You can also export the floor plan to other formats, such as PDF, JPG, or PNG, using the "Export" command.

Making A Simple Floor Plan In Autocad Part 1 Of 3

Basic Floor Plan Drafting In Autocad 7 Steps Instructables

How To Draw Floor Plans In Autocad Edrawmax

Autocad 2024 Making A Simple Floor Plan In Part 1 Of 3 2d Drawing 2025

How To Draw Floor Plans In Autocad Edrawmax

Autocad 2d Basics Tutorial To Draw A Simple Floor Plan Fast And Efective Part 1

Autocad 3d Basics Tutorial To Model A Floor Plan Fast And Effective Part 2

Create Floor Plans With Autocad Lt Acad Systems Autodesk Gold Partner Training Certification Center

How To Make House Floor Plan In Autocad Fantasticeng

Autocad 2024 Tutorial For Beginners Tips Do Draw A Floor Plan Part 4