How to Draw a Floor Plan on AutoCAD 2024
AutoCAD 2024 is a powerful software tool used by architects, engineers, and designers to create technical drawings. If you're looking to draw a floor plan using AutoCAD 2024, here's a step-by-step guide to help you get started:
Step 1: Set Up Your Drawing
Open AutoCAD 2024 and create a new drawing. Set the drawing units to the desired measurement system (e.g., feet, inches). Define the drawing limits to determine the size of the drawing area.
Step 2: Draw the Walls
Select the "Line" tool and start drawing the walls. Use the "Ortho" mode to ensure that the walls are drawn at right angles. Use dimensions to define the lengths and positions of the walls.
Step 3: Create Rooms
Select the "Region" tool to create the interior spaces of the floor plan. Draw a closed loop around each room to create a region. You can label the rooms with text or use the "Insert" > "Dimension" command to create room dimensions.
Step 4: Add Doors and Windows
Select the "Insert" > "Block" command to insert doors and windows. You can use predefined blocks or create custom blocks by creating symbols in the AutoCAD drawing environment.
Step 5: Draw Other Features
Add other features to your floor plan, such as furniture, appliances, and built-in features. Use blocks, polylines, or circles to represent these elements. You can also insert images or symbols to enhance the visual appeal of your floor plan.
Step 6: Dimension the Plan
Use the "Dimension" tools to add dimensions to your floor plan. This will help convey the sizes and measurements of the different elements.
Step 7: Annotate the Plan
Add notes or annotations to your floor plan to provide additional information. Use text boxes, leaders, or symbols to convey details such as room names, door types, or construction specifications.
Step 8: Finalize and Save Your Drawing
Check your floor plan for any errors or omissions. Make necessary adjustments and finalize the drawing. Save your drawing in the desired file format, such as DWG or DXF.
By following these steps, you can create a professional-quality floor plan using AutoCAD 2024. Remember to experiment with different features and commands to enhance the accuracy and presentation of your drawings.

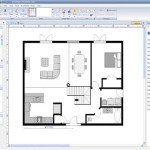
Autocad 2024 Tutorial Making A Simple Floor Plan In 2d Drawing

Autocad 2024 Tutorial Making A Simple Floor Plan In 2d Drawing

Autocad 2024 Basic 2d Floor Plan For Beginner Complete

How To Draw Floor Plans In Autocad Edrawmax

Basic Floor Plan Drafting In Autocad 7 Steps Instructables

Autocad 2024 Basic 2d Floor Plan For Beginner Complete

Autocad 2024 Help File Tab Menu Autodesk

How To Draw Floor Plans In Autocad Edrawmax

Autocad 2024 Help Views With Names Autodesk

Autocad 2024 Making A Simple Floor Plan In Part 1 Of 3 2d Drawing 2025