How to Draw Floor Plans in AutoCAD 2007
Creating floor plans in AutoCAD 2007 is a fundamental skill for architects, engineers, and interior designers. This guide will provide you with a step-by-step overview of the key aspects involved in drawing accurate and detailed floor plans using AutoCAD 2007.
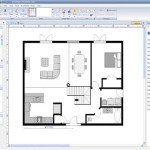
1. Set Up Your Drawing Environment
Begin by setting up a new drawing environment in AutoCAD 2007. Select "New" from the File menu and choose an appropriate template for your project. Ensure that the units and drawing scale are set correctly.
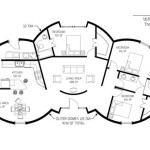
2. Draw the Walls
Start drawing the walls of your floor plan. Use the "Line" command to create straight lines and the "Arc" command for curved walls. Remember to specify the thickness of the walls by using the "Offset" option in the Line command.
3. Add Windows and Doors
Insert windows and doors into the walls using the "Insert" menu or the commands "Window" and "Door". Choose appropriate block symbols or create your own custom blocks.
4. Layer Management
Organize your floor plan by layers. Assign different layers to walls, windows, doors, furniture, and other elements. This will help you manage complex drawings and make changes more efficiently.
5. Dimension the Plan
Add dimensions to your floor plan to indicate the distances between walls, windows, and other features. Use the "Dimension" command to create linear, radial, and aligned dimensions.
6. Annotate the Plan
Add notes and labels to your floor plan to provide additional information. Use the "Text" command to add text annotations, and the "Leader" command to create leader lines pointing to specific features.
7. Add Furniture and Other Elements
Insert furniture, appliances, and other elements into the floor plan. Use the "Insert" menu or create your own custom blocks to represent these elements. Arrange them to create a realistic representation of the space.
8. Export the Plan
Once your floor plan is complete, you can export it to other formats such as PDF, JPG, or DWG. Select "Export" from the File menu and choose the desired file format.
Additional Tips
- Use snaps and object snaps to ensure accuracy in drawing.
- Create layers for different types of annotations (e.g., notes, dimensions).
- Use hatches to fill interior spaces with color and texture.
- Group and lock elements to prevent unwanted modifications.
- Proofread your floor plan carefully for any errors or omissions.

Autocad 2007 Floor Plan Tutorial

Autocad 2007 Tutorial Floor Plan

Solved Draw This With Autocad 2007 And Explain Properly The Chegg Com

Autocad Tutorial 2007 House Plan Design 3 Bedroom

Autocad 2007 Tutorial Complete House Plan In 2d

Autocad 2007 Tutorial Complete House Plan In 2d

How To Draw 2d House Map In Autocad 2007 Part 1 Computer Aided Design Practical Week 6

Part 1 Ground Floor Plan Grid In Autocad By Abel M

First Floor Plan Autocad Tutorial For Beginner 1st Part 2

First Floor Plan Autocad Tutorial For Beginner 1st Part 2