How to Draw a Floor Plan in AutoCAD 2024
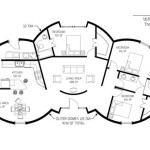
AutoCAD is a powerful computer-aided design (CAD) software used by architects, engineers, and designers to create precise and detailed drawings. One of the most common applications of AutoCAD is for creating floor plans. A floor plan is a two-dimensional drawing that shows the layout of a building or room, including walls, doors, windows, and other features.
Creating a floor plan in AutoCAD 2024 is a relatively straightforward process, but there are a few key steps that you need to follow to get accurate and professional-looking results.
Step 1: Create a New Drawing
To start, open AutoCAD 2024 and create a new drawing by clicking on the "File" menu and selecting "New." In the "Drawing Setup" dialog box, select the appropriate template for your project. For most floor plans, you can use the "Architectural" template.
Step 2: Draw the Walls
Once you have created a new drawing, you can start drawing the walls of your floor plan. To do this, click on the "Line" tool in the "Draw" panel. Then, click on the starting point of the wall and drag the cursor to the endpoint. Repeat this process for all of the walls in your floor plan.
Step 3: Add Doors and Windows
Once you have drawn the walls, you can add doors and windows. To add a door, click on the "Door" tool in the "Insert" panel. Then, click on the location where you want to insert the door. To add a window, click on the "Window" tool in the "Insert" panel. Then, click on the location where you want to insert the window.
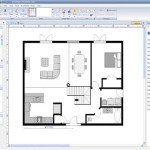
Step 4: Add Furniture and Fixtures
Once you have added the doors and windows, you can start adding furniture and fixtures to your floor plan. To do this, click on the "Insert" menu and select "Block." Then, browse to the location of the furniture or fixture that you want to insert. Click on the block and then click on the location where you want to insert it.
Step 5: Dimension the Floor Plan
The final step is to dimension the floor plan. Dimensioning is the process of adding measurements to the drawing so that it can be accurately constructed. To dimension the floor plan, click on the "Dimension" tool in the "Annotate" panel. Then, click on the first point of the dimension and drag the cursor to the second point. Type in the dimension value and then click on the "Enter" key.
Conclusion
Creating a floor plan in AutoCAD 2024 is a relatively simple process, but it is important to follow the steps carefully to ensure that the results are accurate and professional-looking. By following the steps outlined in this article, you can create a floor plan that will help you to visualize and plan your project.

Autocad 2024 Tutorial Making A Simple Floor Plan In 2d Drawing

Autocad 2024 Tutorial Making A Simple Floor Plan In 2d Drawing

Autocad 2024 Making A Simple Floor Plan In Part 1 Of 3 2d Drawing 2025

Basic Floor Plan Drafting In Autocad 7 Steps Instructables

Autocad 2024 Tutorial Making A Simple Floor Plan In 2d Drawing

Draw Floor Plan And Elevation Using Basic Autocad Commands Acad Systems Autodesk Gold Partner Training Certification Center

How To Draw Floor Plans In Autocad Edrawmax

Making A Simple Floor Plan In Autocad Part 1 Of 3

Autocad Lt 2024 Help File Tab Menu Autodesk

Autocad 2024 Help What S New In Map 3d Toolset Autodesk